

For employees: Using anny Presence
Signing in, automatic check-in, notices and what to do when nothing happens.
When should I use this?
- You want booked desks to actually be used: check-in happens without anyone doing anything as soon as someone works at the desk, and unused bookings can expire as usual.
- You want to allow spontaneous work at free desks: anny books a free desk when someone plugs in and releases it after they unplug.
- You want to know which desks are really used: every check-in is stored on the booking like any other.
- Not suitable for: rooms without a fixed monitor or dock, and people without their own laptop. Use the Check-In Terminal for those.
Ready in five steps
1
Prepare the desks
Turn on check-in and self check-in on every desk (see Requirements on the resource).
2
Turn on anny Presence
Turn on the app for your organization and decide how it learns, checks out and books (see Turning it on and configuring it).
3
Roll out the app
Have your IT install the app on the laptops, ideally with the organization preset (see Rolling out anny Presence).
4
Pair the desks
Walk from desk to desk with your laptop and pair each monitor or dock in the app (see Pairing desks).
5
Check the assignments
Check in the Monitors and docks list that everything is confirmed, and resolve conflicts.
Turning it on and configuring it
You’ll find the settings in the admin area under Settings → anny Presence. anny Presence is on by default. You can also set the settings through the anny API, which is why the technical names are listed below.
Assigning new monitors and docks has three values:
If someone names a different desk for a device that isn’t confirmed yet, the link is marked as a conflict and is no longer used until an admin resolves it. In the Monitors and docks list under Settings → anny Presence, you can confirm a link, assign it to another desk or area, or delete it. Confirming also resolves a conflict.
The app doesn’t learn Wi-Fi access points or network ranges. They have to be linked to an area or location once, centrally. They can only be created through the anny API for now, so during the private beta we set this up together with you. After that, you can adjust them in the Monitors and docks list.
Requirements on the resource
On every desk that should take part, Check in and check out bookings must be on under Resource → Check-In, and Allow self check-in must be on in the Self Check-In section. Without them, the app neither checks in there nor books automatically. You can exclude individual resources from anny Presence under Resource → Check-In → Self Check-In with Allow check-in with anny Presence. It’s on by default, and the technical name isselfCheckIn.desktopAppEnabled.
These existing settings under Resource → Check-In also apply:
anny can only book desks automatically if they’re confirmed immediately and the booking option allows instant booking. There must also be no other booking on the desk in the next 30 minutes.
Pairing desks
The fastest way to assign monitors and docks is right in the app: walk from desk to desk with your laptop, plug in and pair the desk with one click. Each pairing counts for everyone right away and is confirmed. Your anny account needs edit rights for your organization’s desks. You then find Pair desks in the ⋯ menu. You can only pair, move or unpair a desk you’re allowed to edit. If you’re an admin but not in a community of your organization, the app opens pairing directly and never checks you in.1
Start pairing
Open anny Presence and choose Pair desks in the ⋯ menu. Your own check-in pauses until you click Done.
2
Plug in at the desk
Connect your laptop to the desk’s monitor or dock. After a few seconds the device shows up with its state, for example Not paired yet.
3
Pick the desk and pair
The next unpaired desk is already selected (Next). If it’s right, click Pair with …. Otherwise search the List or pick the desk on the Map.
4
On to the next desk
Unplug and go to the next desk. Click Done when you’re finished.
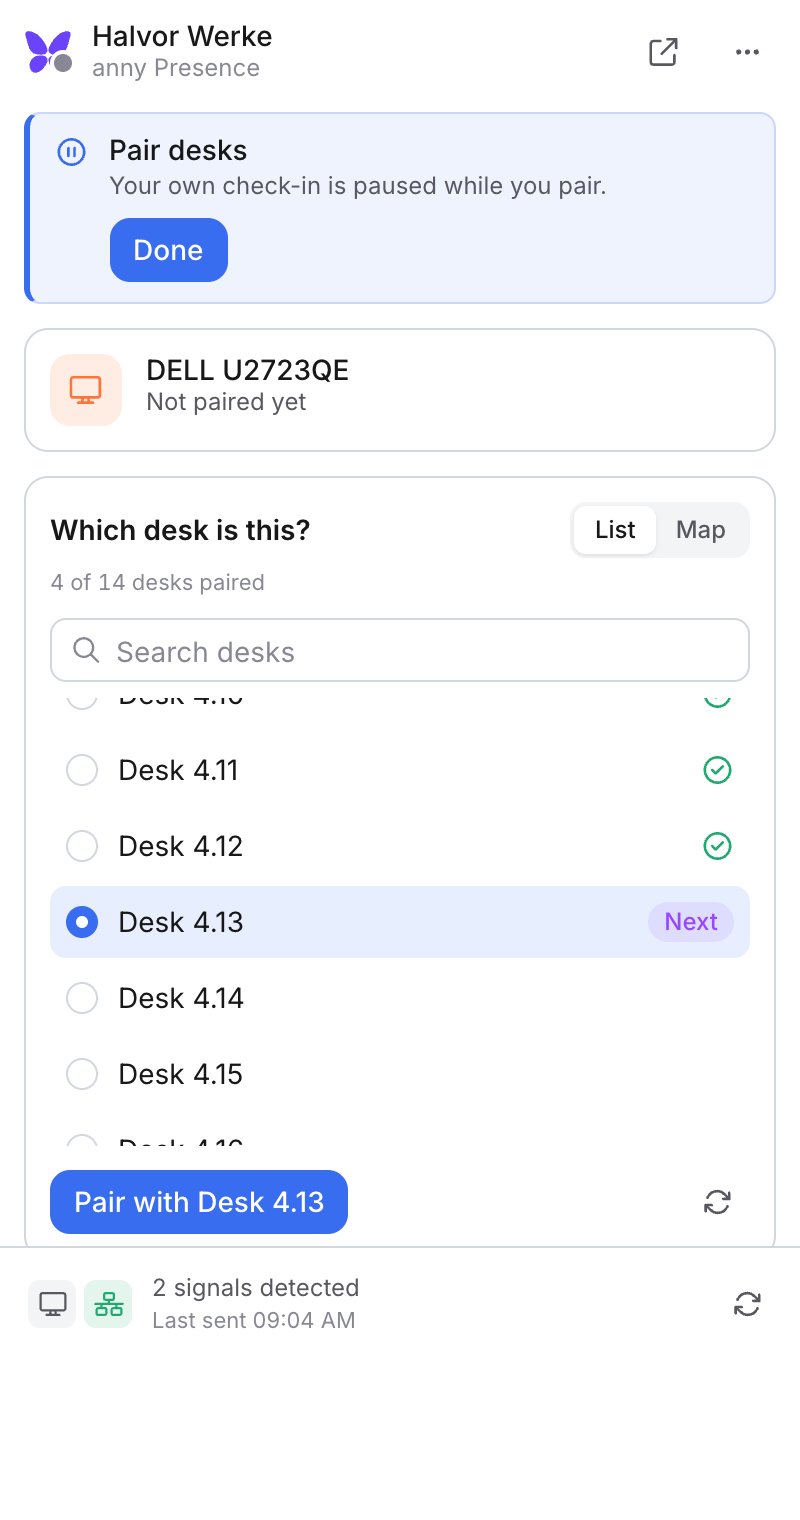
The next open desk is already selected.
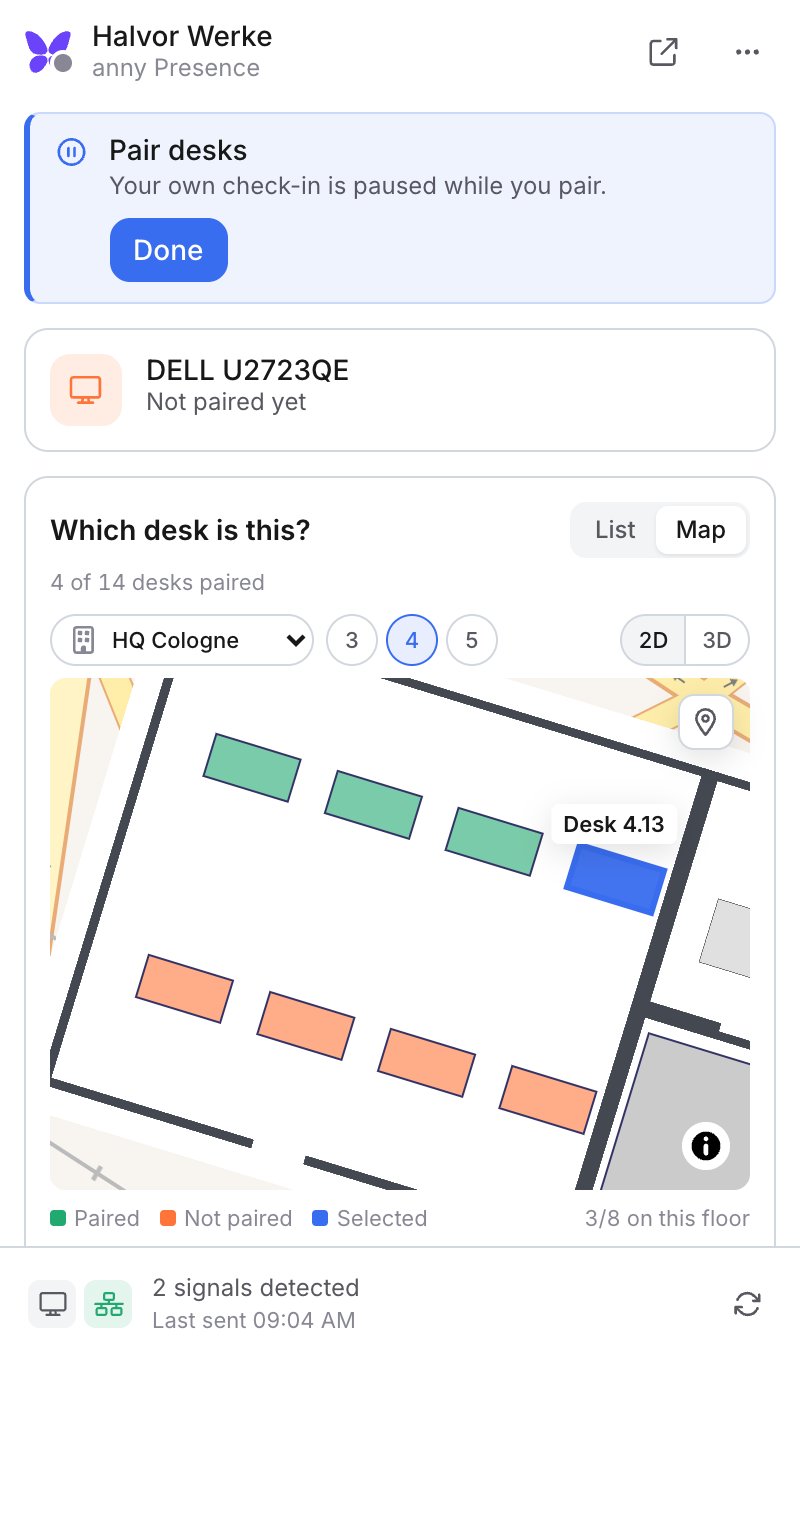
On the map: green paired, orange open, blue selected.
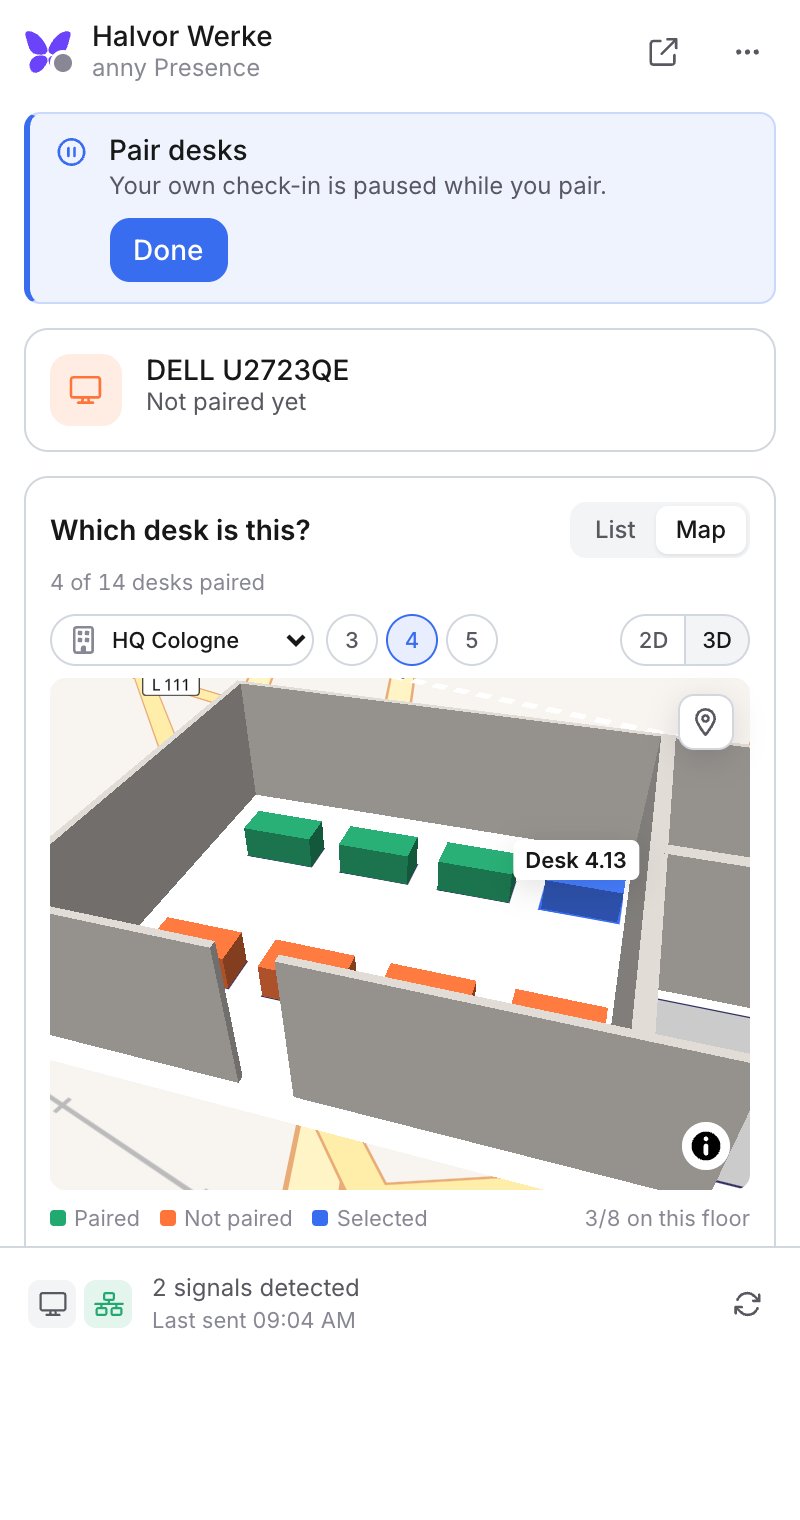
The map is also available in 3D.
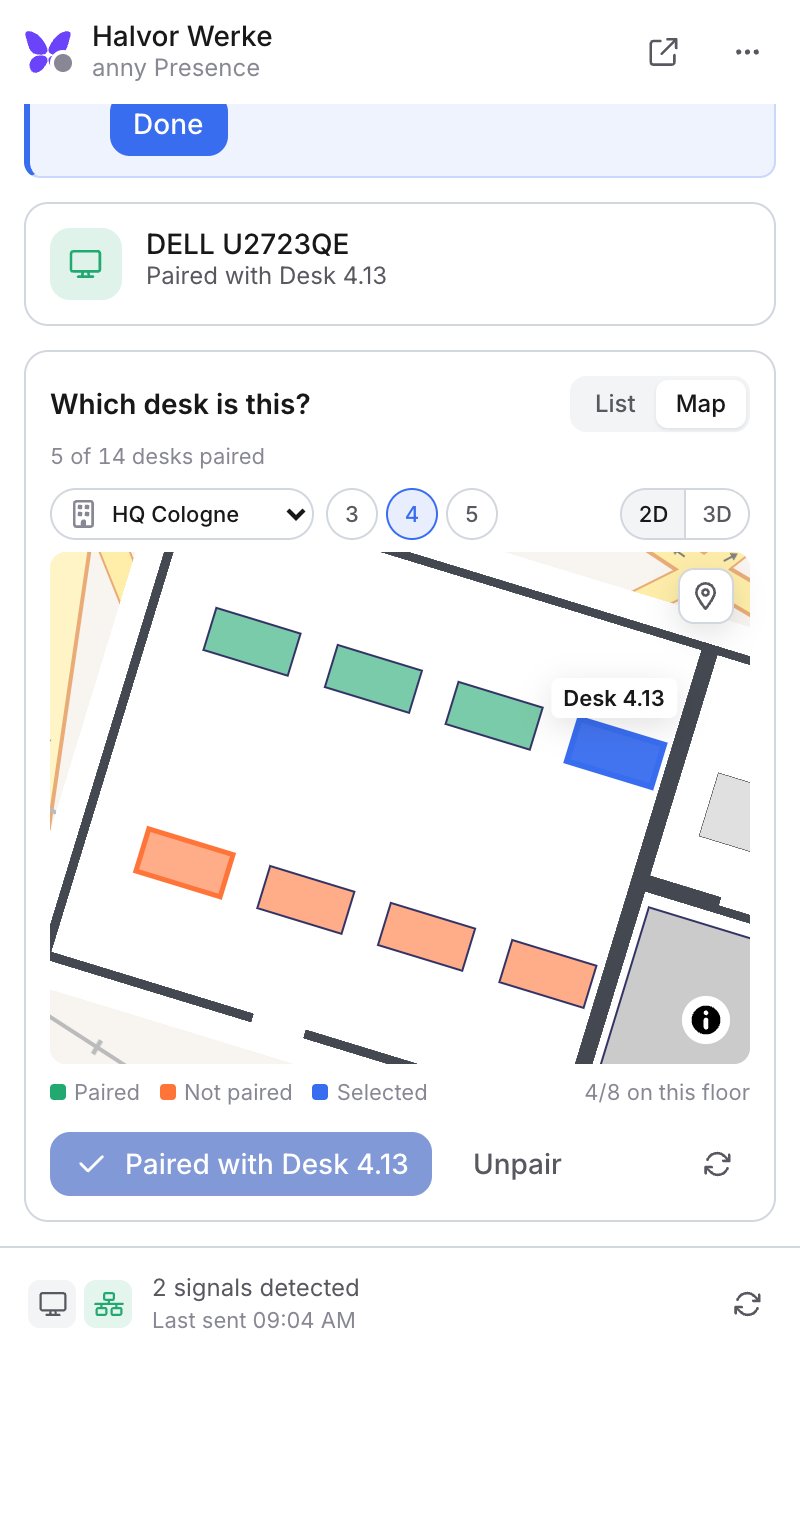
After pairing you move straight on to the next desk.
Rolling out anny Presence (IT)
Installers are available for macOS (.dmg, .pkg, macOS 11 or later), Windows (.msi, .exe, x64 and arm64) and Linux (.deb, .rpm, AppImage). During the private beta, you can get the installers and MDM templates on request via support@anny.co.
All platforms use the same keys. For each key, the first value in this order applies:
- MDM policy: locked, the app shows the setting with a lock and Set by IT policy
- Organization settings from anny
- The person’s own setting, only for signals, Open at login and Updates
- IT defaults: not locked
- Built-in default
Key settings
anny decides the time until check-out and automatic booking on the server, based on the organization settings. You can’t control them reliably through MDM, so use the settings above under “Turning it on and configuring it”.
macOS
The preference domain iscom.anny.presence. There’s a .mobileconfig template and a JSON schema for Jamf Pro. Values in the Forced section are locked.
- Jamf Pro: Configuration Profiles → Application & Custom Settings → External Applications → Custom Schema, domain
com.anny.presence. - Intune: Devices → macOS → Configuration → Templates → Preference file, domain
com.anny.presence, as a plist with the keys above.
Windows
Locked values go underHKLM\SOFTWARE\Policies\anny\Presence, IT defaults under HKLM\SOFTWARE\anny\Presence. Load the ADMX and ADML templates into Group Policy or import them in Intune under Devices → Configuration → Import ADMX. The category is anny → anny Presence. You can also set defaults at install time:
Linux
Locked values live in/etc/anny-presence/policy.json:
FAQ
Do I have to pair every desk myself?
Do I have to pair every desk myself?
No. With Assign new monitors and docks, anny also learns desks from your team’s answers. Pairing in the app is just the fastest way to cover a whole floor at once.
Can I exclude single desks?
Can I exclude single desks?
Yes, under Resource → Check-In → Self Check-In with Allow check-in with anny Presence. The app then tells people there to check in in anny or with the QR code.
Can I see who sits where?
Can I see who sits where?
You see check-ins on the bookings, like any other check-in. The app doesn’t send a location, serial numbers or Wi-Fi names.
Who sees who booked a desk?
Who sees who booked a desk?
If someone plugs in at a desk that’s taken, the app shows the booker’s name only if your organization’s booking preview shows names. Otherwise it says “Someone else”.